Remove pilling by identifying the surface problem first, choosing a tool compatible with the fabric and testing a small area. Work gently on a supported garment and stop when the fabric, rather than just the pills, starts changing. A perfectly smooth finish is not worth thinning a useful sweater.
Separate loose lint from attached pills and pulled knit loops. Read the garment and tool instructions, lay the item flat and test a hidden area. Use light passes with an approved comb or guarded fabric shaver, inspect frequently and stop at snagging or thinning. Reduce friction afterwards, but do not expect permanent prevention.
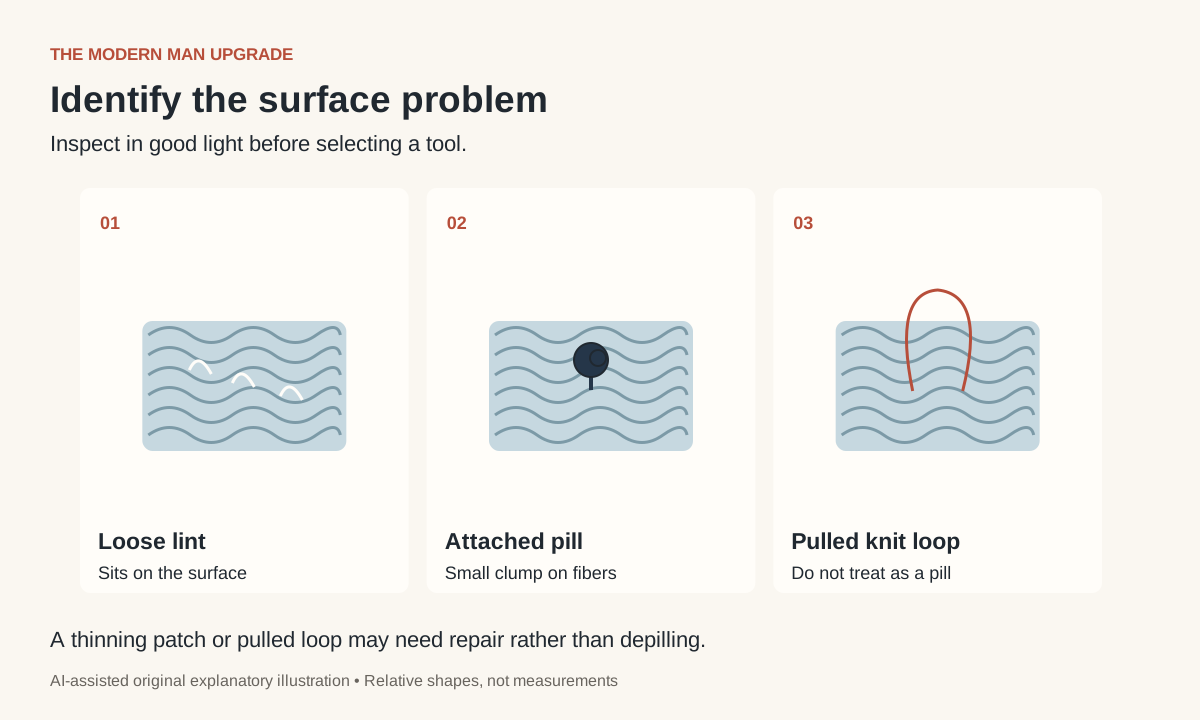
Check whether you are looking at lint, pills or damage
Loose lint sits on the surface and may lift away easily. Pills are small clumps attached to the fabric. A pulled loop is a longer strand drawn out of a knit structure, often after catching on something. A thin patch or hole is another problem again. Do not treat all four as interchangeable fuzz.
Woolmark's pilling guide describes how rubbing during wear contributes to fuzzy balls, often around areas that repeatedly contact other surfaces. Pilling has several causes and is not proof by itself that a garment must be discarded. Inspect the surrounding fabric before deciding what to do.
Look in good light and gently separate the garment from anything beneath it. If you see a long loop, avoid cutting it as though it were a pill. Ask the maker or a repair professional about restoring the knit. If a seam is failing or the surface already looks thin, removal may make the situation worse.
Choose a compatible tool, not the most aggressive one
- Lint roller or fabric brush: useful for compatible fabrics with loose surface lint. It may not remove firmly attached pills.
- Sweater comb: an option when its instructions allow the garment's fiber and construction. Use gentle contact rather than pulling at the knit.
- Guarded fabric shaver: suitable for some fabrics when the tool instructions permit it. Guard settings and the shape of the surface matter.
Patagonia's care guide compares removal tools, including combs and fabric shavers. Its recommendations for particular garments do not mean every loose knit, decorative yarn or delicate fabric can tolerate the same tool.
Check the garment label and the maker's care information, then the tool manual. A laundry label may not specify depilling, so an absence of a prohibition is not positive permission. Raised embroidery, loose loops, open knits and surface decoration deserve extra care. For a valuable or uncertain item, ask before experimenting.
A bare shaving razor is not the default beginner method here. Exposed blades make it easy to cut fabric while trying to remove a small surface problem. Start with a compatible purpose-made tool and a controlled test rather than an improvised shortcut.
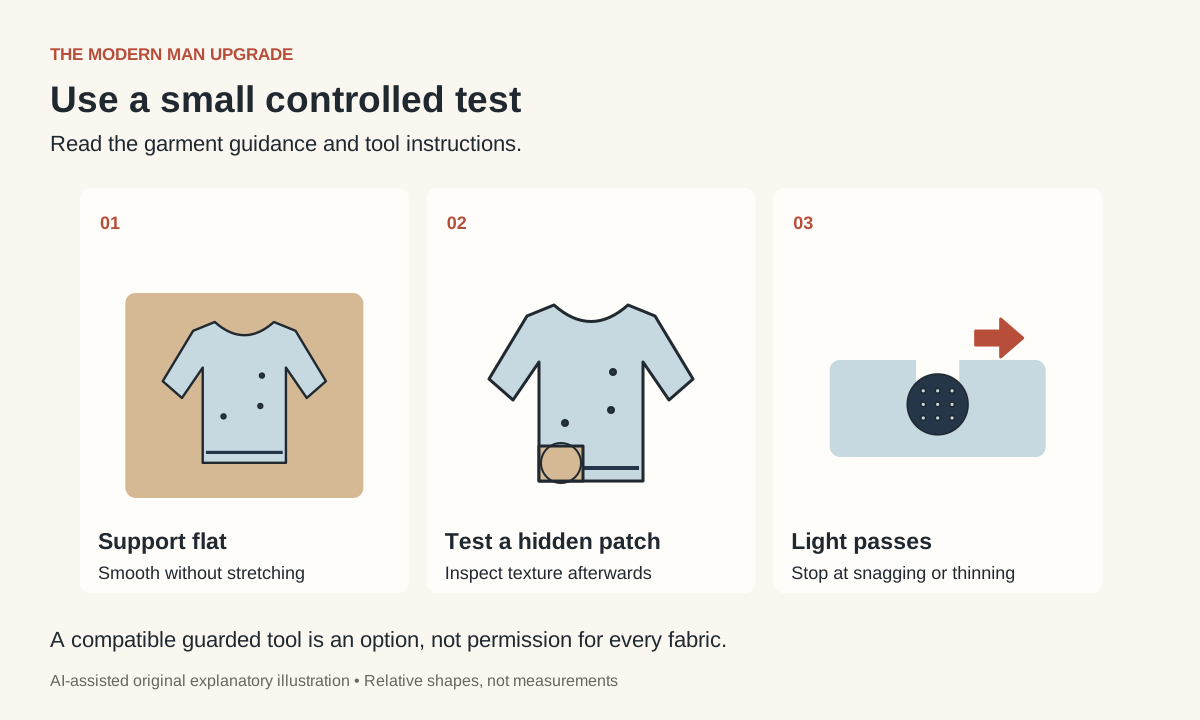
Test on a flat, supported garment
- Read any preparation requirements in the tool instructions. Keep the item clean and dry when the method requires it.
- Lay the garment on a clean flat surface and smooth it gently without stretching the knit.
- Choose a small inconspicuous area with similar fabric and pilling.
- Make a light pass using the permitted setting or technique.
- Inspect the patch for snagging, texture changes or thinning before continuing.
- Work in small sections, remove loose debris and check the result frequently.
Maytag's removal guide specifically recommends testing a hidden area and checking tool suitability. Its broader laundry suggestions are not universal wool-care instructions. Preserve the garment maker's requirements when the advice differs.
Keep attention on edges, seams, ribbing and raised details. These are not the same flat surface as the middle of a sweatshirt. Follow the tool's restrictions rather than running it across every part of the garment in one sweep. Empty or clean the tool as directed, turning it off before handling its cutting parts.
Know when to stop
Stop immediately if the tool catches, draws out a loop, changes the knit texture or makes an area look thinner. Do not repeat stronger passes over a stubborn pill without checking what the tool is contacting. Leaving a little surface texture is preferable to removing the structure that holds the garment together.
A useful stopping point is a visible improvement with the fabric still intact. Take a before-and-after photo of the test area in the same light if you want a consistent comparison. This is a personal care record, not evidence that every garment will respond in the same way.
For example, a sweater with a few underarm pills may need only a brief compatible treatment. A cardigan with pulled loops around a bag strap may need repair and a change in how it is worn. A thinning elbow should not be repeatedly shaved to chase a uniform finish.
Reduce friction in wear and washing
Check where the pills recur. A rough bag strap, repeated desk contact or rubbing between layers can point to a practical change. Adjust the contact where possible and inspect the garment occasionally. Removing pills does not alter every condition that produced them.
Follow the care label for sorting, detergent, cycle and drying. Keep delicate knits apart from abrasive items when the washing method allows it. Turn suitable garments inside out as recommended by their maker, and avoid overloading the wash. Do not use a harsher cycle to scrub pills away.
For wool, use the wool washing guide rather than applying generic enzyme or fabric-softener advice. For the rest of the wardrobe, the clothes-care guide helps establish a label-led routine. Pilling removal and washing are related maintenance tasks, but they solve different problems.
Pilling questions
Will one treatment prevent future pills?
No. Continued wear and friction can produce more. Aim for careful maintenance and reduced abrasion, not a permanent cure.
Does pilling prove poor quality?
No single surface symptom settles overall quality. Consider construction, wear conditions and whether the fabric remains functional before replacing it.
Should I pull pills off with my fingers?
Avoid tugging at firmly attached clumps or loops. Use a compatible gentle method; if you cannot distinguish a pill from a pulled strand, pause and ask about the fabric.
Use the wardrobe audit to separate items needing small maintenance from items with fit or structural problems. The free Top 3 filter can help put a manageable care task into your next three priorities.